
In PART 1 of this series we have discussed in depth all the theory and concepts involved in playing ahead or behind the beat, so as to set the foundation of the work that needs to be done to master this skill. Now it’s time to start practicing.
The main exercise to develop this technique consists of trying to move away from the click by playing slightly ahead or behind it, which means arriving a bit early or a bit late on the metronome. ‘Slightly’ means about 10 milliseconds (1/100th of a second).
We have two ways of making sure we are more or less there: the more straight forward is to listen to the video demos and try to emulate what we hear.
The more accurate and recommended way is to use a Digital Audio Workstation (like Pro Tools or Logic or Reaper), record ourselves and not only listen back but also measure, on an actual grid on a computer’s screen, that our hits are consistently 10 milliseconds away from the beat (with a margin of plus/minus a couple of milliseconds) and we are actually doing what we think we are.
It’s important to take advantage of modern audio recording tools to reexamine our performances: the feedback obtained will be indispensable to verify what sensation gets communicated and whether or not it’s the desired one.
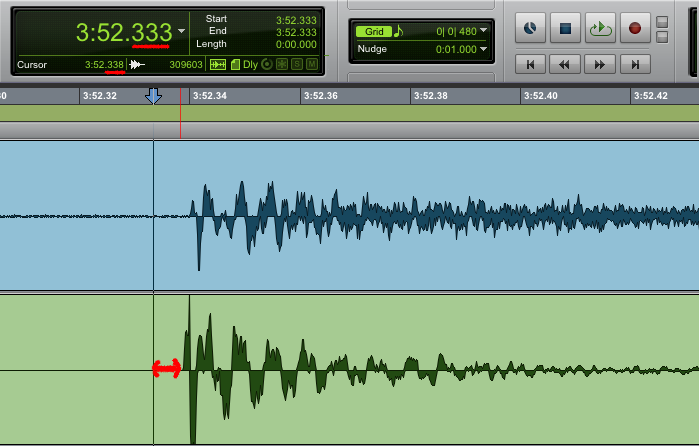
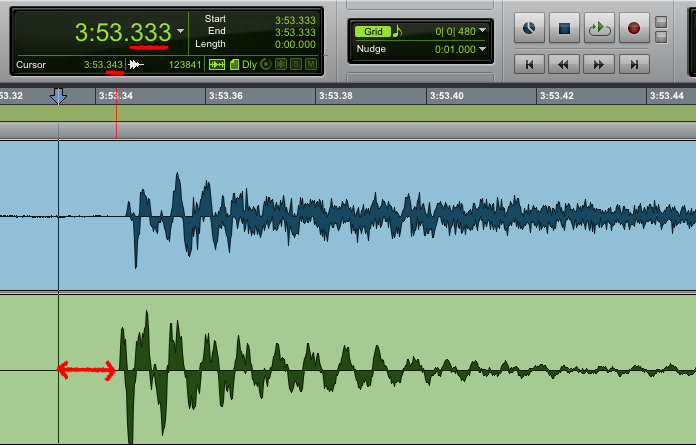
The following two screenshots show the way 5 and 10 milliseconds off the grid (behind in this case) look in a DAW when zoomed in. The green track is the Snare Drum. By clicking on the image we can hear the way it sounds.
5 milliseconds:
10 milliseconds:
We can also check out these two short clips in which I play along a track with a behind the beat and ahead of the beat approach, respectively, to get a taste of the effect on the feel:
– Behind the beat track excerpt.
– Ahead of the beat track excerpt.
Let’s start from a simple preparatory exercise: basic quarter notes, executed with the Snare Drum at a slow but comfortable tempo (80 bpm), 5 minutes a day ahead and 5 minutes behind, spending a few weeks on familiarizing with the idea and the control involved.
Snare Drum Behind:

Snare Drum Ahead:

Once we have reached a good command of this initial example, we can move on to the list of exercises below.
To work on taking these techniques to a professional level we can use the following program in 3 levels:
- Level 1: Playing ahead or behind involving all limbs, focusing on a single amount of about 10 milliseconds. Going through the entire set of studies which involve exercises, then grooves, then fills, then faster tempos and even improvisations.
- Level 2: Repeating everything trying different amounts, specifically the even subtler deviation of 5 milliseconds.
- Level 3: Repeating everything (where applicable) experimenting with using one limb at the time playing ahead or behind, especially the Snare Drum.
It’s important to practice these levels and the following studies in the exact order suggested. Even more important is to stick to each step until we have completely mastered it, which takes lots of patience, given the unusual combination of simplicity of the examples and difficulty of the precise execution required.
We could work just on Level 1 and stop there, or go deeper and complete the entire program based on our needs.
To download a free PDF printable version of this article, which includes all transcriptions, click here:
Level 1:
Exercise 1: set the metronome to 60 bpm and play quarter notes for 5 minutes exactly on the beat, with each limb separately (for a total of 20 minutes). Repeat every day.
Exercise 2: set the metronome a 60 bpm and play for 5 minutes focusing on placing the notes slightly behind the click.
The idea is that you should hear a subtle consistent flam between the metronome and your strokes. That flam equals to about 10 milliseconds.
Repeat for each limb separately, like in exercise 1.
Exercise 3: 60 bpm, 5 minutes for each limb, but this time place the notes slightly ahead of the click.
Exercise 4: 60 bpm, exactly on the beat like in exercise 1, but this time play unisons for 10 minutes, all four limbs aligned and playing simultaneously.
Exercise 5: 60 bpm, behind like in exercise 2, but playing unisons for 10 minutes.
Exercise 6: 60 bpm, ahead like in exercise 3, but playing unisons for 10 minutes.
Exercise 7: play quarter notes, with each limb separately, and play 4 bars on the beat, 4 behind, 4 on the beat, 4 ahead, in loops. 5 minutes for each limb, at 60 bpm.
Exercise 8: repeat exercise 7 but this time play unisons, 10 minutes every day, going through the entire 16 bar study (4 bars on the beat, 4 behind, 4 on the beat, 4 ahead).
Exercise 9: start playing simple beats, at 60 bpm, and do 5 minutes on the beat, 5 minutes behind and 5 minutes ahead.
Video Demo – On The Beat
Video Demo – Behind
Video Demo – Ahead
Exercise 10: improvise simple fills and licks, at 60 bpm, and play 5 minutes on the beat, 5 minutes behind and 5 minutes ahead.
Video Demo – On The Beat
Video Demo – Behind
Video Demo – Ahead
Exercise 11: play a groove at 60 bpm and improvise fills every 2 or 4 bars. Do 5 minutes on the beat, 5 minutes behind and 5 minutes ahead.
Video Demo – On The Beat
Video Demo – Behind
Video Demo – Ahead
Exercise 12: repeat exercise 11 at different tempos, starting from 80, 100, 120 and 140 bpm. Spend 5 minutes a day on each bpm.
Video Demo – 80 bpm – On The Beat
Video Demo – 80 bpm – Behind
Video Demo – 80 bpm – Ahead
Video Demo – 100 bpm – On The Beat
Video Demo – 100 bpm – Behind
Video Demo – 100 bpm – Ahead
Video Demo – 120 bpm – On The Beat
Video Demo – 120 bpm – Behind
Video Demo – 120 bpm – Ahead
Video Demo – 140 bpm – On The Beat
Video Demo – 140 bpm – Behind
Video Demo – 140 bpm – Ahead
Exercise 13: repeat exercises 1 to 10 at least at two more tempos: 80 bpm and 100 bpm.
Exercise 14: repeat exercise 11 and 12 improvising more advanced rhythms and fills.
By focusing on one exercise per week the entire program will take about three months of practice.
This is done strategically, given the complexity of the topic, to let the information sink in and to gradually start associating the sensations linked to each approach to timing, until we can effortlessly execute each variation.
We can spend entire days investigating a specific approach, in order to get even more familiar with that dimension.
Level 2:
If we want to make the most of these techniques we can repeat each exercise focusing on a different amount of ahead and behind.
As discussed we can go through the list again, from the top, this time trying even smaller micro deviations, in order to achieve more control and get to the point where we can decide not only whether to play in front or on the backside of the pulse, but also by how much.
Thus boosting the number of options we have at our disposal when it comes to what feel we want to infuse the music with.
So, as soon as placing notes ahead or behind the beat has become second nature, it’s time to refine the entire process working on the 5 milliseconds amount.
Having developed control over 10 milliseconds, we now have the sensitivity to distinguish minuscule fractions of a second (which, by the way, means our timing got a lot better).
Again, to practice effectively this very subtle variation, we need both the good practice of recording ourselves and listening back, and the help of a DAW.
At this point we are going to be able to handle 5 beat placement nuances, which we can label as follows:
- Really ahead of the beat (10 milliseconds).
- Slightly ahead of the beat (5 milliseconds).
- On the beat.
- Slightly behind the beat (5 milliseconds).
- Really behind the beat (10 milliseconds).
The following demo shows these variations using a basic drum beat, and we can start from there (notice that these micro variations can’t be transcribed using current music notation).
Then the idea is to repeat all exercises from Level 1 using the 5 millisecond approach, so as to cover all 5 nuances in different scenarios.
Slightly ahead of the beat (5 milliseconds):

Really ahead of the beat (10 milliseconds):

Slightly behind the beat (5 milliseconds):

Really behind the beat (10 milliseconds):

The amount of milliseconds we deviate from the center of the beat has a more evident effect as the tempo gets faster. This is also one of the reasons why it’s crucial to be able to control different nuances.
While at slow tempos 5 milliseconds are almost imperceptible, at higher bpms they will be the highest deviation allowed.
The reason why that’s the case is that 5 milliseconds are a much bigger chunk of a fast beat than of a slow one. If at 60 bpm every beat lasts 1 seconds, 5 milliseconds will be 0.5 percent of the pulse. At 120 bpm, instead, 5 milliseconds will be one percent of the beat, twice as much.
So let’s use these two amounts as a reference, a starting point, and not an inflexible rule.
Level 3:
Lastly we can repeat everything focusing on one limb at the time, and one component of the beat (actually this can be applied only on exercises 9 to 14 from Level 1).
In this case the possibilities are:
- Moving just the Snare Drum, keeping Bass Drum and Hi-Hat exactly on the beat. As we said already, this is the most used solution, and the most important to practice.
- Moving just the Bass Drum, with no intervention on Snare and Hi-Hat.
- Moving just the Hi-Hat, maintaining Snare and Bass Drum unchanged.
This phase also requires quite a bit of time, which, based on how well we have worked on the previous parts, can span from a few weeks to many months.
Snare Ahead:

Snare Behind:

Bass Drum Ahead:

Bass Drum Behind:

Hi-Hat Ahead:

Hi-Hat Behind:

To get a taste of how all these examples sound it’s important to check out the YouTube video demo, which can also be accessed by clicking on each transcription/link.
One question that comes up is what the Hi-Hat is supposed to do when Snare and Bass Drum move around.
Moving just one sound generates a micro flam between the components involved. A 10 milliseconds flam is totally noticeable and can ruin the feel of what we are playing.
The common solution lies in adjusting the notes played in unison with those placed ahead or behind, and play them in the same way, with perfect alignment.
This creates a little hop in the part that does that, because all other notes remain unchanged. Not only this tiny fluctuation is acceptable, it even contributes to strengthen the groove.
Only after we have worked extensively on developing these techniques we will be ready to mix them with everything else we do.
That’s when the real fun part begins and we start to enjoy mixing all parameters and noticing how incredibly beneficial doing that is for our groove and time feel.
We can experiment and go as deep as we want. Let’s keep in mind that once we establish a certain feel (dead center, on top or laid back), our fills have to be consistent with it and sound congruent with the grooves we play.
Overtime we are going to develop an inner sense of what playing in a certain way feels like: we will feel one way when we are ahead of the beat and another way when we are behind.
The more we cultivate this skill, the more returning to those sensations will make us certain that we are actually playing with the desired feel.
To wrap this up, let’s repeat it one more time: playing ahead or behind the beat doesn’t mean speeding up or slowing down! It means interpreting the beat, the pulse, and playing around it in very subtle ways.
That is of course a lot more evident when we have a metronome to listen to (or another musical instrument positioned exactly on the beat), but over time our inner pulse will tell us where the beat is with such certainty that we will be able to play a little ahead or behind just using this internal reference, thus achieving very similar results even without a click, when needed.
As a matter of fact, as soon as we have internalized this skill playing along with a metronome, we could go back and repeat the whole thing even without using it.
In this case the reference against which to play ahead or behind the beat will only be our inner clock, that is our timing.
Obviously in this case it’s going to be even more important to record ourselves, until we achieve a solid connection between the feel that we intend to create and what actually gets poured into what we play.
Once we have established this link, and once we are confident that the sensation we want to transmit is accurately expressed in our performances, all we have to do is focus on the specific solution to obtain the desired result.
Recalling a certain internalized sensation will automatically make us play with that beat placement, and will generate that feel and the associated feelings described in PART 1.
In PART 3 we are going to check out a few examples from records where we can hear these techniques at work.
Related resources:
PART 1 – Theory
PART 3 – Examples
‘Groove Mastery & Formulas’ – Altitude Drumming – Volume 8
‘Click & Timing’ – Altitude Drumming – Volume 6
‘Theory & Concepts’ – Altitude Drumming – Volume 1
Share